Traits
Trait is a concept in Iron which means a piece of logic code that is attached to object(s) or scene(s).
There are 4 different types of traits:
-
Haxe Trait: Haxe text-based scripting trait that can be used to write game-play logic in.
-
Logic Nodes Trait: Visual scripting trait for writing game-play logic in. It is similar to UE4's Blueprints.
-
Canvas Trait: Trait for UI, it is Zui's canvas under the hood. And it uses Armory2D as WYSIWYG editor.
-
WebAssembly (WASM): WebAssembly can also be used as scripting trait, It can be written in Rust/C/C++ and than complied to WASM to use it in Armory (WASM will only work with Krom target). WASM is very useful when it comes to plugins, you can use Libraries made in Rust/C/C++ and compile it to WASM and then use it in Armory and Kha. Two examples that are used in ArmorPaint: Texture-synthesis(Rust), Chips(C).
Haxe
Create a cube, name it Haxe and place it wherever you want. Select it and go to Scene - Armory Scene Trait.
- Click
+, select Haxe and clickOK, Haxe trait placeholder should appear. - Click
New Scriptand name the script of your choice, just make sure the first letter is capital (HaxeScriptfor me). - Finally hit
Edit Script, your system default IDE should now open up with the project.
// In HaxeScript.hx
package arm;

//Imports
import iron.object.Object;
import iron.math.Vec4;
import iron.Scene;

class HaxeScript extends iron.Trait {
    // Initialise haxeCube as Object
    var haxeCube:Object;

    public function new() {
        super();
        //NotifyOnInit function get executed when the 'trait' is initiated.
        notifyOnInit(function() {
            //Get haxeCube Object from active Scene.
            haxeCube = Scene.active.getChild("Haxe");
        });

        //NotifyOnUpdate function get executed every frame.
        notifyOnUpdate(function() {
            //Rotate haxeCube with Vec4(x, y, z) and speed.
            haxeCube.transform.rotate(new Vec4(0.0, 0.0, 1.0), 0.01);
        });
    }
}
Now, if you were to play it, you should see Haxe cube rotating!.
Logic Node
Create a cube, name it Nodes and place it wherever you want. Select it and go to Scene - Armory Scene Trait.
- Click
+, select Nodes and clickOK, Nodes trait placeholder should appear. - Change your editor type to
Logic Node Editorand click+New. - A node tree should be created, you can rename it by editing the text field (
LogicNodesfor me). - Go back to
Scene - Armory Scene trait, select the logic nodes place holder and clickTree, selectLogicNodesin dropdown.
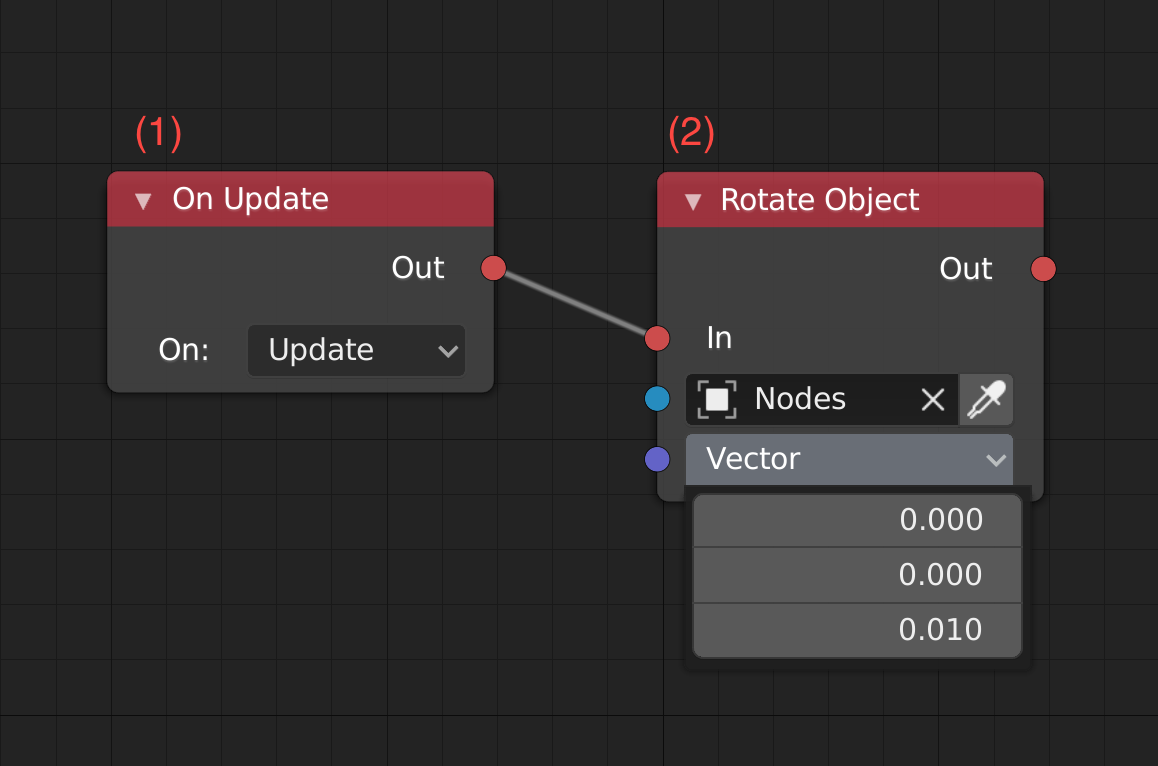
and now add following nodes (Shift + A):

- On Update: It is triggered every tick.
- Rotate object on axis, speed is set directly in vector.
Now if you play it, Nodes cube should start spinning.
Wasm
Create a cube, name it Wasm and place it wherever you want. Select it and go to Scene - Armory Scene Trait.
- Click
+, selectWasmand clickOK, Wasm trait placeholder should appear. - Click
New Module, and it should re-direct you to WebAssembly Studio, selectEmpty Rust Project(you can select c/c++ too) and clickCreate. - Enter
Rust/C/C++code and clickBuildand there should bemain.wasminoutfolder, right-click and download it. - Put outputted
main.wasminBundledfolder (create one, if there is none). - Go back to
Scene - Armory Scene Trait, select previously createdWasmplaceholder, clickRefreshand selectmaininModuledropdown.
// Rust example of rotating cube
// main.rs
extern {
    fn notify_on_update(f: extern fn() -> ()) -> ();
    fn get_object(name: *const i8) -> i32;
    fn set_transform(object: i32, x: f32, y: f32, z: f32, rx: f32, ry: f32, rz: f32, sx: f32, sy: f32, sz: f32) -> ();
}

#[no_mangle]
pub extern "C" fn update() -> () {
    unsafe {
        let name = std::ffi::CString::new("Wasm").unwrap();
        let object = get_object(name.as_ptr());
        static mut rot: f32 = 0.1;
        rot += 0.01;
        set_transform(object, 0.0, 0.0, 0.0, 0.0, 0.0, rot, 0.5, 0.5, 0.5);
    }
}

#[no_mangle]
pub extern "C" fn main() -> i32 {
    unsafe {
        notify_on_update(update);
    }
    return 0;
}
Now if you play it then you should have spinny rusty wasm cube.
Canvas
- Click
+, selectUIand clickOK,Canvastrait placeholder should appear. - Click
New Canvasand enter the name and clickEdit Canvas. - Add
Textelement and set text asHello World from Canvas!and save it.
If you play it now, you should see Hello World from Canvas.
Check Canvas tutorial for more!
You should finally get this:
🎉 There we go! We covered the basics of Traits! 🎉
If anything goes wrong, don't forget to check source code